
Water softeners represent a crucial home investment, addressing the pervasive issue of hard water and its detrimental effects on plumbing and appliances.
This comprehensive instruction manual will guide you through understanding, installing, operating, and maintaining your new system for optimal performance and longevity.
From recognizing the signs of hard water to mastering advanced features, we’ll empower you to enjoy the benefits of softened water throughout your home.
What is Hard Water?
Hard water is characterized by a high mineral content, primarily calcium and magnesium. These minerals are naturally dissolved from rocks and soil as water travels through the earth. While not a health risk, hard water causes numerous inconveniences within your home’s plumbing system.
You’ll often notice its effects as a white, chalky buildup – known as scale – on faucets, showerheads, and within pipes. This scale reduces water flow, diminishes the efficiency of water heaters, and shortens the lifespan of appliances like dishwashers and washing machines.
Furthermore, hard water interferes with soap’s ability to lather effectively, requiring more detergent for cleaning and leaving behind soap scum residue. Identifying hard water is the first step towards understanding the benefits a water softener can provide, protecting your investment and improving daily life.
Why Install a Water Softener?
Installing a water softener offers a multitude of benefits, extending far beyond simply eliminating scale buildup. By removing calcium and magnesium, softened water protects your plumbing infrastructure, preventing costly repairs and extending the life of your water heater, dishwasher, and washing machine.
You’ll experience improved cleaning efficiency, requiring less detergent for laundry and dishes, and enjoy softer skin and hair after bathing. Reduced scale also translates to lower energy bills, as your water heater operates more efficiently without mineral accumulation.
A water softener is a proactive investment in your home’s value and your family’s comfort, addressing the root cause of hard water problems and providing a consistent supply of clean, soft water for years to come. It’s a modern solution to an age-old problem.

Understanding Your Water Softener System
Familiarizing yourself with the core components of your water softener is essential for effective operation and maintenance, ensuring years of reliable, softened water delivery.
Components of a Typical Water Softener
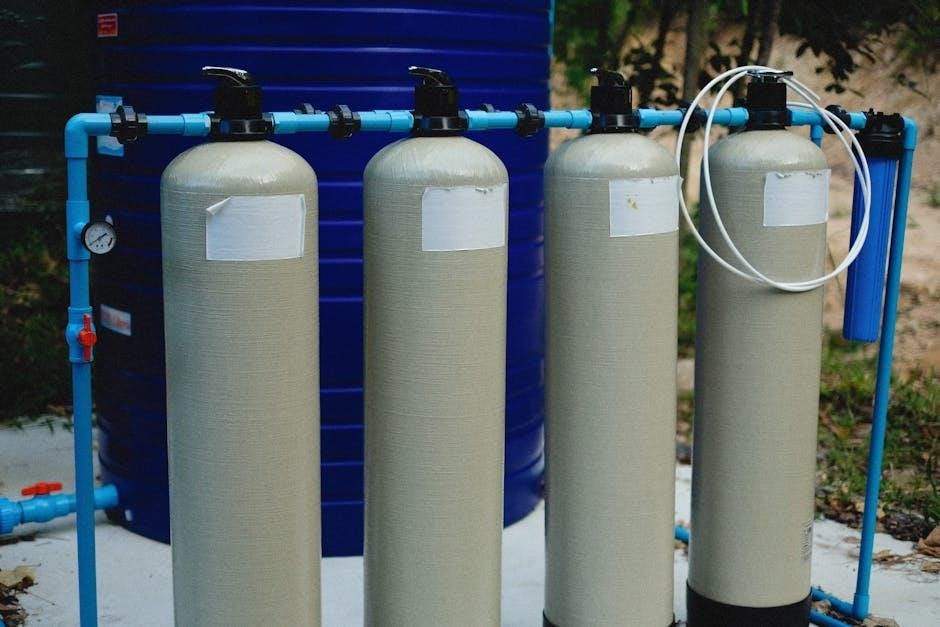
A standard water softener system comprises several key components working in harmony to remove hardness minerals like calcium and magnesium from your water supply; The resin tank, often a large, cylindrical vessel, is where the ion exchange process occurs, utilizing resin beads to trap these minerals.
Alongside the resin tank is the brine tank, a separate container holding a highly concentrated salt solution (brine) used to regenerate the resin beads. The control valve acts as the system’s “brain,” orchestrating the entire softening and regeneration cycles based on pre-programmed settings or demand.
Additional components include the injector/venturi, responsible for creating the necessary suction during regeneration, and various pipes and fittings connecting everything. Understanding each part’s function is crucial for troubleshooting and maintaining optimal performance, extending the lifespan of your water softening investment.
Resin Tank: The Heart of the System
The resin tank is undeniably the central component of your water softener, responsible for the critical ion exchange process. Inside, thousands of tiny, porous resin beads are coated with sodium ions. As hard water flows through the tank, calcium and magnesium ions – the culprits behind water hardness – adhere to the resin beads, displacing the sodium ions.
This exchange effectively “softens” the water, removing the minerals that cause scale buildup and reduce appliance efficiency. The capacity of the resin tank, measured in grains, determines how much hard water it can soften before requiring regeneration.
Regular regeneration is vital to replenish the sodium ions on the resin beads, ensuring continued softening performance. Maintaining the resin bed’s integrity is paramount for long-term system effectiveness, avoiding issues like channeling or fouling.
Brine Tank: Salt Storage and Regeneration
The brine tank serves a dual purpose: it securely stores the salt – typically rock salt, solar salt, or pellet salt – and facilitates the crucial regeneration process. During regeneration, the control valve draws water from the brine tank, creating a highly concentrated salt solution, or brine.
This brine is then flushed through the resin tank, effectively replenishing the sodium ions on the resin beads that were depleted during the softening cycle. Proper salt level maintenance within the brine tank is essential; insufficient salt hinders regeneration, while excessive salt can lead to inefficient operation.
Regularly inspect the brine tank for salt bridging – a hard crust forming on the salt surface – and break it up to ensure optimal brine production. A clean and properly maintained brine tank is fundamental for consistent water softening.
Control Valve: The Brains of the Operation
The control valve is the central command center of your water softener, orchestrating the entire softening and regeneration process. It meticulously monitors water usage, initiates regeneration cycles, and regulates the flow of water through the system. Modern control valves often feature sophisticated programming options, including demand-initiated regeneration (DIR) and timed regeneration.
DIR systems learn your household’s water consumption patterns and regenerate only when necessary, maximizing efficiency and salt savings. Timers, conversely, regenerate on a pre-set schedule, regardless of water usage. Understanding your valve’s settings is crucial for optimal performance.
The valve also incorporates a bypass function, allowing you to isolate the softener for maintenance or emergencies without interrupting your water supply. Familiarize yourself with the valve’s display and buttons for seamless operation.
Installation Process
Proper installation is paramount for optimal softener performance. This section details connecting to your water supply and drain line, alongside crucial initial setup procedures.
Carefully follow these steps to ensure a leak-free and efficient system.
Choosing the Right Location
Selecting an appropriate location for your water softener is critical for both functionality and long-term maintenance. Ideally, the installation site should be near the main water line entry point into your home, ensuring all water passes through the system.
A level, solid surface is essential to support the softener’s weight, especially when filled with water and salt. Avoid areas prone to flooding or freezing temperatures, as this can damage the unit. Ensure sufficient space around the softener – at least 18 inches on all sides – for easy access during servicing and salt replenishment.
Proximity to a suitable drain is also vital for the regeneration cycle’s wastewater discharge. Finally, consider access to a standard electrical outlet, as most modern softeners require power for operation. Careful planning at this stage will prevent future complications.
Connecting to Water Supply
Connecting to your home’s water supply requires careful attention to detail to ensure a leak-proof and efficient installation. Begin by shutting off the main water supply valve to your house. Next, cut the main water line, preparing it to connect to the softener’s inlet and outlet ports.
Utilize appropriate fittings – typically compression or solder connections – and Teflon tape to create watertight seals. The inlet port connects to the incoming water supply, while the outlet port directs softened water into your home’s plumbing.
Important: Observe the flow direction indicated on the softener housing. After making the connections, slowly turn the main water supply back on, carefully inspecting for any leaks. Tighten fittings as needed to eliminate drips and ensure a secure connection.
Connecting to Drain Line
Establishing a connection to a suitable drain line is vital for the water softener’s regeneration process, which expels brine solution. Locate a nearby floor drain, laundry tub, or standpipe capable of handling the discharge. Avoid connecting directly to a sewer line, as backflow prevention is crucial.
Use a dedicated drain line – typically ½-inch or ¾-inch flexible tubing – to run from the softener’s drain port to the chosen drain location. Ensure an air gap exists between the drain line’s end and the drain opening to prevent potential contamination.
Important: Secure the drain line to prevent siphoning. Proper drainage is essential for efficient operation and prevents water damage. Double-check all connections for tightness before initiating the system.
Initial System Setup & Resin Charging
Before first use, proper system setup and resin charging are essential for optimal performance. After connecting the water supply, slowly open the main water valve, allowing the resin tank to fill completely. This process removes any manufacturing debris and prepares the resin beads for softening.
Next, initiate a manual regeneration cycle. This flushes the system and saturates the resin with the brine solution. Refer to your control valve’s instructions for initiating a regeneration. Monitor the brine tank to ensure it fills appropriately with water.
Allow the regeneration cycle to complete fully before using softened water. This initial charge ensures the resin is conditioned and ready to effectively remove hardness minerals.

Operation and Maintenance
Consistent maintenance ensures your water softener operates efficiently and delivers consistently soft water. Regular monitoring and timely upkeep are key to longevity.
Understanding the regeneration cycle, salt levels, and water hardness is vital for optimal system performance and preventing potential issues.
Understanding the Regeneration Cycle
The regeneration cycle is a critical process where your water softener cleans itself and replenishes the resin bed with the necessary brine solution for continued softening.
This automated process typically occurs overnight when water usage is low, ensuring uninterrupted soft water availability. It consists of several stages: backwash, brine draw, rinse, and refill.
Backwash flushes out sediment and debris accumulated in the resin tank. Brine draw pulls the salt-rich brine from the brine tank through the resin bed, exchanging sodium ions for hardness minerals.
The rinse stage then washes away the remaining brine and displaced minerals. Finally, the refill stage replenishes the brine tank with water, dissolving salt to prepare for the next regeneration.
The frequency of regeneration depends on your water hardness and softener settings; demand-initiated regeneration (DIR) adjusts this cycle based on actual water usage, maximizing efficiency.
Adding Salt to the Brine Tank
Maintaining an adequate salt level in the brine tank is essential for your water softener’s proper function. The brine tank utilizes salt – typically rock salt, solar salt, or evaporated salt – to create the brine solution used during regeneration.
Regularly check the salt level, ideally monthly, and replenish when it falls below half full. Avoid letting the salt level drop completely, as this can disrupt the regeneration process and reduce softening efficiency.
Always use salt specifically designed for water softeners; avoid using ice melt or table salt, as these contain impurities that can damage the system.
When adding salt, ensure it’s poured directly into the tank, avoiding the central brine well. Remove any salt bridges – hard crusts forming on the surface – by breaking them up with a broom handle to ensure proper brine formation.
Proper salt management guarantees consistent water softening and extends the life of your system.
Monitoring Water Hardness
Regularly monitoring your water hardness is crucial to ensure your water softener is functioning optimally and providing consistently soft water. Initial testing establishes a baseline, while periodic checks reveal any performance decline.
You can use readily available water hardness test kits – either strip-based or liquid drop tests – purchased from hardware stores or online retailers. These kits measure the concentration of calcium and magnesium ions, indicating water hardness levels.
Compare your test results to your initial hardness reading and the softener’s settings. If hardness increases, investigate potential issues like insufficient salt levels, a malfunctioning control valve, or resin exhaustion.
Consistent monitoring allows for proactive adjustments, preventing scale buildup and protecting your plumbing and appliances. Record your readings to track trends and identify potential problems early on.
Maintaining soft water safeguards your home’s water systems and enhances appliance efficiency.
Cleaning the Injector/Venturi
The injector/venturi is a critical component responsible for creating the suction that draws brine from the brine tank during regeneration. Over time, mineral deposits and sediment can accumulate, restricting water flow and hindering the regeneration process.
Periodic cleaning is essential to maintain optimal softener performance. Begin by turning off the water supply and bypassing the softener. Disconnect the injector assembly, carefully noting the orientation of its parts.
Inspect the injector and venturi for any visible buildup. Use a small brush or needle to clear any obstructions in the narrow openings. A solution of warm water and mild detergent can help dissolve mineral deposits.
Rinse thoroughly to remove all traces of cleaning solution before reassembling the injector; Ensure all parts are correctly positioned to prevent leaks or malfunctions. Regular cleaning ensures efficient brine draw and effective regeneration.

Troubleshooting Common Issues
Addressing problems promptly ensures continued efficient operation. This section details solutions for low pressure, salty water, regeneration failures, and resin tank concerns.
Follow these steps for a smoothly functioning system!
Low Water Pressure
Reduced water pressure after softener installation often stems from a few key areas. First, verify the bypass valve is fully open; a partially closed valve restricts flow. Next, inspect the inlet and outlet connections for any kinks or obstructions in the plumbing lines.
A clogged injector or venturi is a frequent culprit, hindering the regeneration process and lowering pressure. Refer to the ‘Cleaning the Injector/Venturi’ section for detailed instructions on disassembly and cleaning. Sediment buildup within the resin tank itself can also contribute to pressure loss; a professional cleaning may be necessary.
Ensure the control valve isn’t malfunctioning. If the issue persists, check your home’s main water pressure – a softener cannot increase pressure, only maintain it. Finally, confirm the resin tank isn’t overly full, potentially restricting water flow. If none of these resolve the issue, contact a qualified plumber.
Salty Taste in Water
A salty taste in your softened water usually indicates a problem with the regeneration cycle or the brine tank. The most common cause is excessive salt being drawn into the resin tank during regeneration, often due to an improperly adjusted control valve. Verify the brine draw setting is correct according to the manufacturer’s recommendations.
Check the brine tank water level; it should be several inches above the salt bed. A low water level can cause the softener to draw salt directly. Inspect the brine line for any cracks or leaks that could allow salt to enter the water supply prematurely. Ensure the salt used is specifically designed for water softeners – rock salt can contain impurities.
If the taste persists, run a manual regeneration cycle and then flush the system thoroughly. If problems continue, consult a plumbing professional to assess the control valve and brine system.
System Not Regenerating
If your water softener isn’t regenerating, several factors could be at play. First, verify the control valve is set to the correct time and regeneration schedule. Check for error codes displayed on the valve, as these provide valuable diagnostic information. Ensure the system has power – a tripped breaker or loose connection can prevent regeneration.
Inspect the brine tank for obstructions or a hardened salt bridge, which can block water flow. Confirm the drain line isn’t clogged or kinked, as proper drainage is essential for the regeneration process. Examine the injector/venturi for debris or mineral buildup, hindering water flow.
If the issue persists, perform a manual regeneration to test the system. If it still fails, consult a qualified plumber for further assistance.
Resin Tank Issues & Replacement
The resin tank, containing the ion exchange resin, is vital for softening water. Over time, resin beads can become fouled with iron, sediment, or chlorine, reducing efficiency. Regular cleaning with a resin cleaner can restore performance. However, eventually, the resin will degrade and require replacement – typically after 10-15 years, depending on water quality and usage.
Signs of failing resin include consistently hard water despite proper regeneration, increased salt usage, and a noticeable decrease in water flow. Replacing the resin involves draining the tank, removing the old resin, and filling it with new, high-quality resin beads.
Always follow manufacturer’s instructions for resin replacement and disposal. Consider professional assistance if you’re uncomfortable performing this task.

Advanced Features & Settings
Modern water softeners offer customizable settings like Demand Initiated Regeneration (DIR) and metered cycles, optimizing efficiency and salt usage for personalized water treatment.
Demand Initiated Regeneration (DIR)
Demand Initiated Regeneration (DIR) is a smart feature available on many modern water softeners, representing a significant advancement over traditional, timed regeneration cycles. Unlike timed systems that regenerate on a pre-set schedule – regardless of actual water usage – DIR monitors your household’s water consumption.
The softener’s control valve tracks the volume of water used between regeneration cycles. When the pre-programmed capacity is reached, then the regeneration process is initiated. This “on-demand” approach dramatically reduces wasted water, salt, and electricity, leading to lower operating costs and a more environmentally friendly system.
To enable DIR, consult your softener’s control panel settings. Ensure the system is configured to monitor water usage and trigger regeneration based on capacity depletion, rather than a fixed time interval. Properly configured DIR maximizes efficiency and extends the lifespan of your resin bed.
Metered vs. Timed Regeneration
Water softener regeneration is crucial for maintaining optimal performance, but the method – metered or timed – significantly impacts efficiency. Timed regeneration operates on a pre-set schedule, typically regenerating every few days, irrespective of actual water usage. While simple to set up, this can lead to wasted water, salt, and energy if your household’s demand is lower than the programmed cycle.
Metered regeneration, conversely, utilizes a flow meter to track water consumption. The softener regenerates only when it has processed a pre-determined volume of water, ensuring regeneration occurs only when necessary. This “on-demand” approach conserves resources and lowers operating costs.
Choosing between the two depends on your household’s water usage patterns. For consistent, high water demand, timed regeneration might suffice. However, for variable usage or a desire for maximum efficiency, metered regeneration is the superior choice.
Bypass Valve Functionality
The bypass valve is a critical component of your water softener system, offering several essential functions. Primarily, it allows you to isolate the softener from your home’s water supply without interrupting water flow. This is invaluable for maintenance, repairs, or during extended absences when softening isn’t required, preventing unnecessary salt usage and regeneration cycles.
A properly functioning bypass valve also provides a direct, unsoftened water source for outdoor use, like watering lawns or washing cars, where softened water isn’t desired. It’s typically a three-valve setup – one inlet, one outlet, and one to the softener – allowing you to direct water around the unit.
Familiarize yourself with the bypass valve’s operation; knowing how to engage it quickly can prevent water damage during emergencies or system malfunctions.